Cut and Draw Sewing Patterns with Cricut
General ·My least favorite part of sewing is printing patterns, then cutting them out, then trying to cut them out from the fabric, and then trying to figure out how to transfer all the markings. Since I only sew for dolls, most of my patterns are quite small, I decided to try cutting them out using my Cricut Maker cutting machine.
Turns out, cutting your own patterns is not as easy as it should be. While the Cricut software, Design Space, allows you to upload a raster image, like a JPG or PNG, this may not produce the desired result. Let’s look at some steps I have found to correctly cut sewing patterns AND draw markings.
Step One: Turn Your Pattern into and SVG
Tracing your patten in a vector editor and exporting it as an SVG file is the easiest way to get a good result. SVG files contain instructions for the computer to draw lines and shapes. Design Space can convert these instructions into the movement of the pen or cutting tool.
If you drafted your pattern by hand, first scan it into the computer. Make sure to use a large resolution like 150DPI or 300DPI.
Next, import your scanned file into your vector editor. Some popular vector editors include the following:
- Adobe Illustrator - Win/Mac/iOs - requires subscription
- Affinity designer - Win/Mac/iOs - one time fee
- Inkscape - Win/Mac/Linux - free
- Vectornator - iOS - free
Any of the apps above will let you import an image, trace it and export an SVG. In most desktop apps you can simply drag and drop your image onto the artboard/canvas. Mobile apps should have an import button or option in a menu.
I then add some guides, and rotate my pattern so it is aligned with the guides.
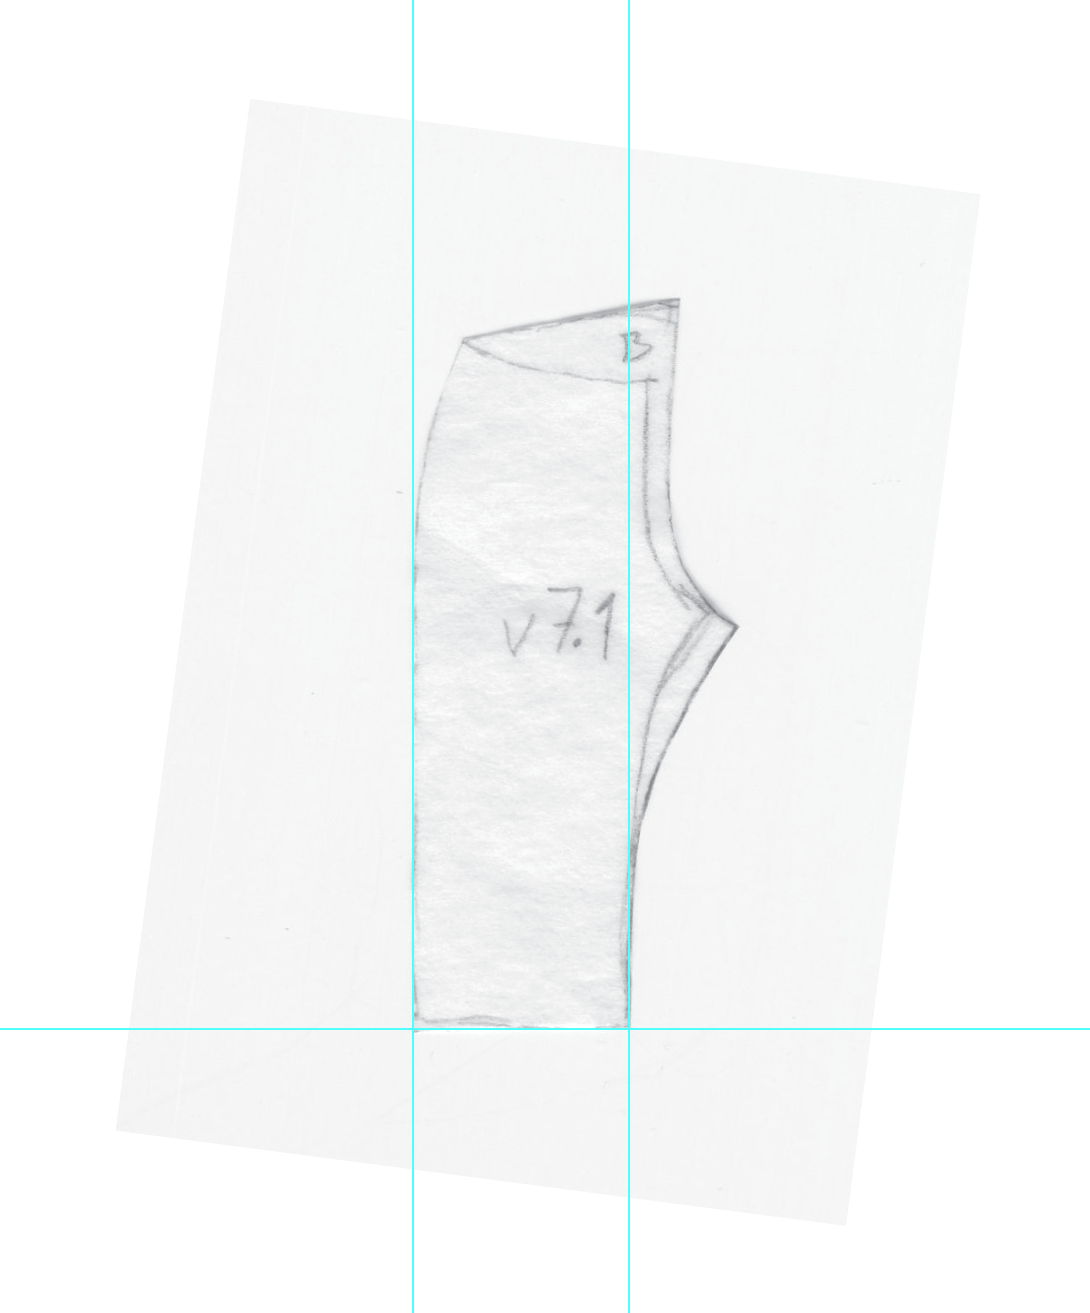
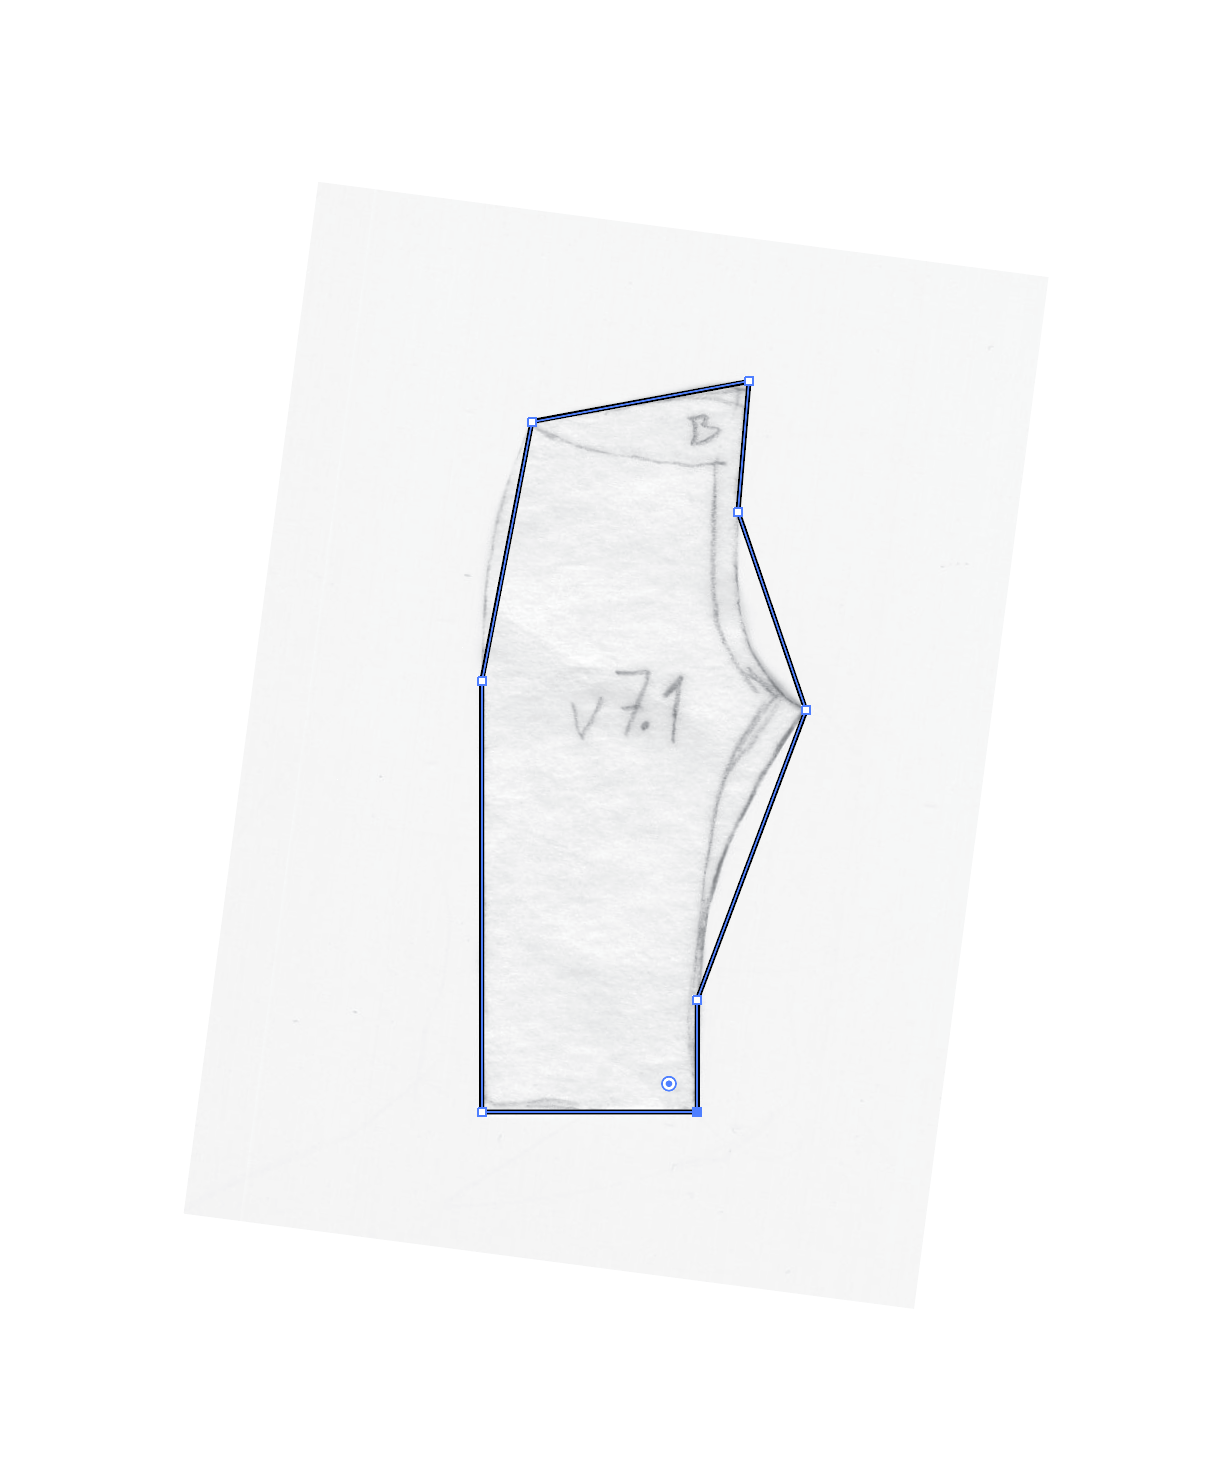

Now you can use the pen tool to trace your pattern. If you are using Illustrator I recommend using the “Curvature Tool”. I trace only the seam lines and add a 1/4 seam allowance after. A good strategy is to add points to all the corners then use the handles to adjust the placement of the curves. Points can also be added to the highest part of a curve, or places where a curve changes direction. In Illustrator you can use the “Direct Selection Tool” (white arrow) and “Anchor Point Tool” to adjust the curves. Other programs will have similar tools.
Adding Seam Allowance
Once you have your pattern piece traced, it’s time to add the seam allowance. I use a 1/4 inch seam allowance for all my doll clothes, because you can sew it with a 1/4 inch presser foot (or 1/4 inch needle position). In Adobe Illustrator you can use the “Offset Path” command from the menu. This will preserve your original piece and create another piece with the added allowance.

In other apps, you can duplicate your shape, then create a stroke on the outside of your shape, that is the width of your desired allowance. Place this stroked piece below your original shape. If your stroke width only accepts points, 18pt is 1/4 inch in points. Make your stroke and shape the same color. Expand this stroked shape, then unite the 2 resulting shapes to create your pattern piece with added seam allowance. The shape with added seam allowance will be your cut line. The original shape can be used to draw the seam lines.
Arranging Your Pattern Pieces
Create all your pattern pieces and arrange them as if you were cutting them out of fabric. I try to minimize waste by putting the pieces close to each other, and turning some pieces upside down if the fabric allows it. Make sure to note the grain lines on the pattern and arrange the shapes so the grain lines match. Design Space only arranges shapes based on the bounding boxes, not the actual cut lines. This will likely create a lot of waste if your shapes are not simple rectangles.

Lastly, ungroup all your shapes, then move all shapes you will want drawn with a pen to one layer and all the shapes you want cut out to another. Delete any linked files, guides, and anything else that is not part of your pattern.
Step Two: Import into Design Space
Open Design Space and start a new project. Click “Upload” then choose “Upload Image”. You should see a preview. If you are lucky, all your shapes will be be in the correct places. Some of the shapes may move if Design space has trouble reading the file. I will offer some tips to try later on.
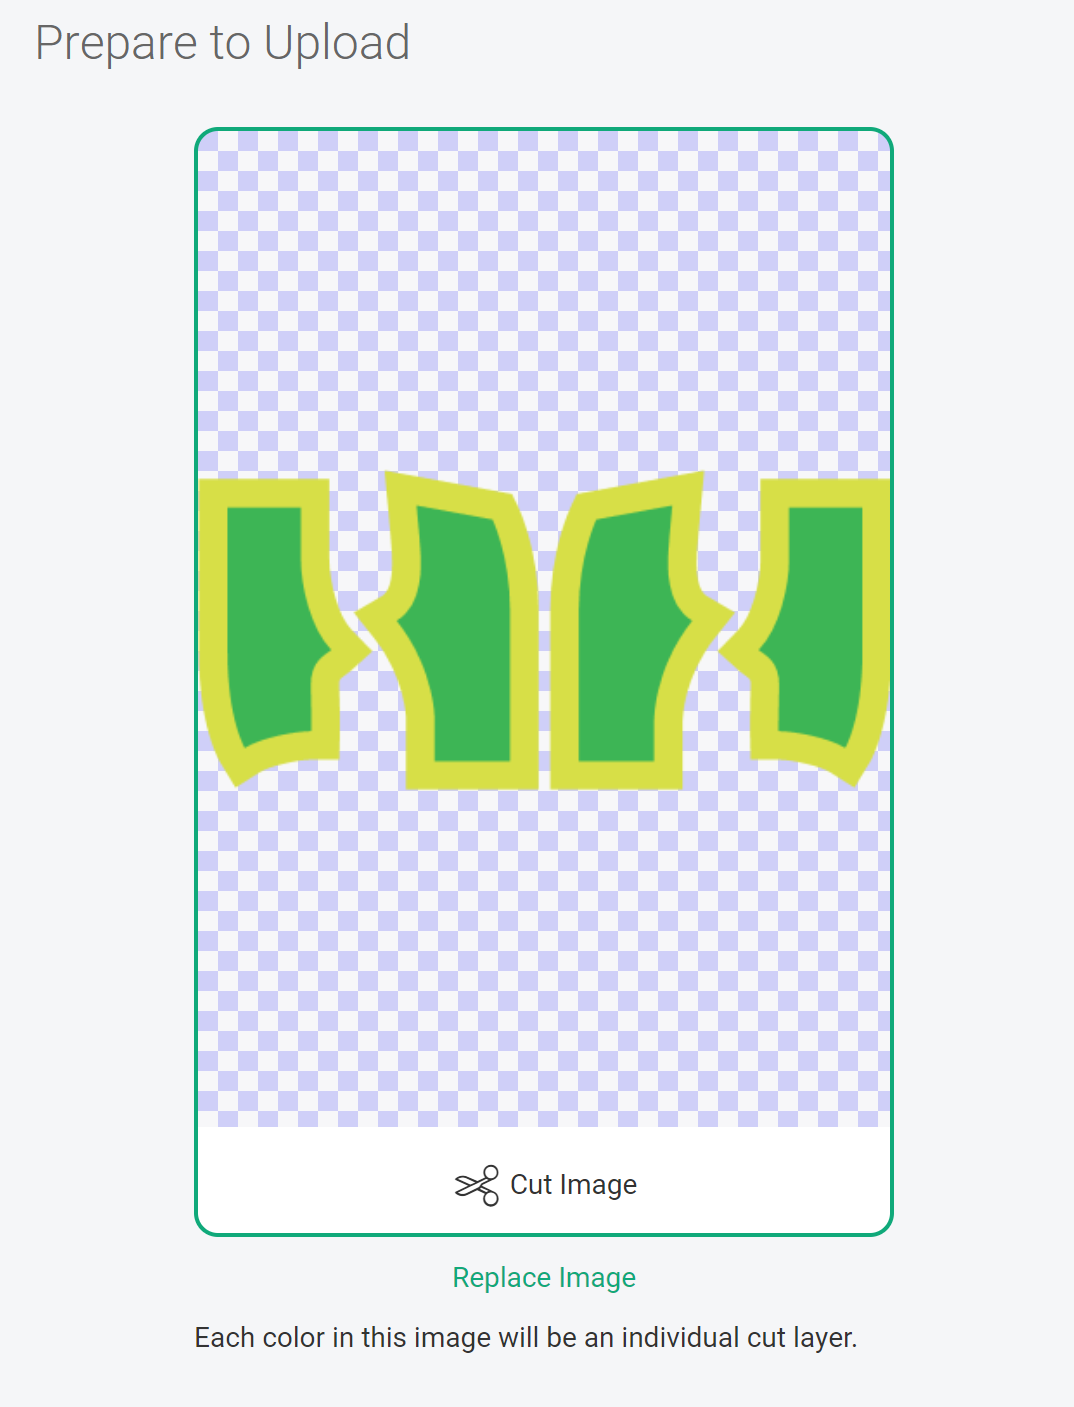
If your image looks good, click “Upload”, then select your image and click “Add to Canvas” (the green button at the bottom right).
If you put your shapes on different layers in the previous step, they will now be in different groups. The names of the groups will be the name of the file, not the group names from Illustrator. You can select the groups and change the “Operations” and colors. Choose the seam line group and use the “Operations” dropdown to change it to “Pen”. You can also change the color to “Marker” and “Blue (washable fabric)”, but I don’t think this has any effect of how the machine draws with the pen.

Lastly, make sure to select all your shapes and click “Attach”. Otherwise design space will think you want the pen and cut on different matts.
Optional Steps
Adding Text
Cutting machines like the Cricut can only work with lines/curves and shapes. Fonts from your computer are shapes, not lines. If you use a regular font, the machine will draw the outline. Instead you can use your programs “Pencil” tool to hand write text. This text will consist of line/curves, so the machine will be able to draw them using a pen.
Adding Markings
If you need to add markings to your pattern, you can trace them with the “Pen” or “Pencil” tools and add them to your draw layer. I haven’t found a way to draw just one dot, as the machine will ignore single points. Instead you can draw a very short line.
The machine has a hard time drawing on knits. The pen tool ends up pulling the fabric off the mat. In this case, you can instead have it cut out a notch. (I do this to mark the front side of the sleeve pieces for a t-shirt.) In your vector file, draw small triangle. Place the triangle at the edge of your pattern piece where you want a notch. Then subtract the triangle from your pattern piece using “Minus Front”. (In Illustrator this is in the “Pathfinder window”.)
Troubleshooting
Sometimes when you import a file, some shapes will move. Try these techniques in your vector file, export a new SVG and try importing again.
Rectangles
Most often this happens with very simple shapes, like squares and rectangles. To fix this, you can just add one random point to each of the shapes. I think this is because Design Space can’t correctly interpret the SVG instructions for drawing a rectangle. When you add an extra point, these shapes become polygons and Design Space reads them properly.
Missing shapes
Sometimes files will look correct when previewing the import, but then a shape will be missing or have moved. If the shape was not a square/rectangle, you can try some of these options:
- Draw a rectangle larger than your problem piece and place it over top of it. Select both pieces and use “Intersect” to combine these into one shape. In Illustrator this will be in the “Pathfinder” window.
- If all else fails, redraw your shape from scratch, export and try importing again : (
Hope these tips will help you also start cutting your doll patterns on your Cricut.